Followers

Saturday, December 10, 2011

Nibbles the mouse says: From the heart, Merry Christmas!

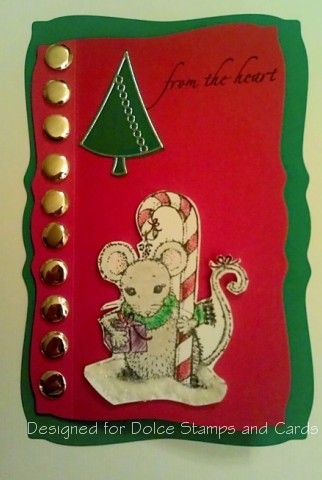
This cute little mouse was fun to color. I used pastels this time. I would have rather used Copics, but don't quite have my collection full of all the colors I want yet. (I'm a long ways from complete, but did pick colors I love and little by little can add to it.)
The challenge this week was to use metallic colors, which was my choice. I scored the front of the card to open like a book and used 3-D tape under it. A different technique for me which was super easy. Below is the 'recipe' for the card. Be sure to check out the other awesome designers I have had the pleasure to design with for the last 6 months at http://dolcestampsandcards.blogspot.com/  The challenge is to get others to use metallic colors in their card. Enter for a chance at a prize at Dolce Stamps & Cards. This is my last card required for the design team, but I hope to participate as a guest designer now and then, or perhaps as a contest participant :-)

Stamp(s): Impression Obsession, D4597 (My friend Jim named him Nibbles ;-), SU greeting
Paper: Wild Cherry, Hero Arts Pine Layering, White cardstock
Ink: Memento Tuxedo Black
Other Color: pastels/chalk, red marker
Embellishments: Candi (paper brads), Flower Soft Polar White 'snow', Elizabeth Craft Designs Christmas tree sticker
Tools: Big Shot, Spellbinders Nestabilities Curved Rectangles S5-006

Thanks for looking!


Sunday, November 27, 2011

Joyful Holiday Wishes

Stamps: Hero Arts 'Wreath with Bells', Stampin Up greeting
Paper: Wild Cherry red cardstock, designer paper
Ink: Memento Tuxedo Black, Versamark, Various Copic markers, metallic watercolor paint
Tools: Spellbinders Circles, Paper trimmer, Big Shot, Heat gun
Accessories: White Organza ribbon, Glitter Ritz Silver Glitter, Candi paper 'brads', 3-D tape, Candi 3-D adhesive, Tombo adhesive

The challenge this time was to do a center-step card. I've never done a center step card, so I was happy it turned out on my first try. There was a great tutorial on SCS which helped a lot. The image itself took about an hour and a half for me to color. First I embossed it. Then I colored it. The silver on the bells is a metallic watercolor paint I found, which I love, but it takes quite a few layers to make it a solid color. If you just want it for an accent, you can color with something else and then just brush one layer on. I used Candi paper brads (really just colored circles) that I thought would work well for the bells. I like how it turned out since it's a different color than what I used on the bell itself. Kinda funky! I'm usually really conservative with my colors and matching.A final touch was the silver Glitter Ritz glitter on the greeting. I love, love, love this glitter! It is truly microfine and after you apply it to a strong double sided adhesive, you burnish it in to brighten in. Just be sure not to touch the adhesive so that it stays clean. I bought 6 jars of this stuff and each jar will probably last me a lifetime! A little goes a long way!

Snowy Mittens

Stamps: Impression Obsession: Mittens, 'Snow Happy'

Paper: Smooth White
Ink: Memento Tuxedo Black, Memento Summer Sky, Tim Holtz Fired Brick, Distress Ink, Versamark, Memento 'Lady Bug' red marker

Tools: Spellbinders Classic Scalloped Circles Large, Spellbinders Curved Rectangles, Detail Scissors, Big Shot, Tim Holtz Inkssentials Blending Tool, Heat Gun

Accessories: Flower Soft Polar White, Crystal Stickers Rhinestones, Light Blue & Red ribbon, 3-D tape, Silver embossing powder


This card was a lot of fun to make. The challenge this time was to use your main image to make your own background paper, or at least part of the image. I got some pointers from Sandra, the owner of Dolce Stamps. She showed me how to blend color into the paper by starting off the page, so it starts lighter and not so intense on the edges. I used the tool from Tim Holtz. It looks like a little hand stamper and is really handy. It's hard to tell, but the background has a faint blue tint to it pulled in from the edges about 1/3 of the way in or so. I really like how you can make the embossed image pop off the page by using this technique.

Sunday, October 30, 2011

Tabitha the Witch

I finally made a big purchase of Copics a couple weeks back. I think I have a new addiction. I have about 24 colors so far, including the colorless blender, which is a lifesaver for little mistakes.
This set is from Taylored Expressions. I love their Moka line. Happy Halloween!

Get Well

A simple, but bright and cheery card for anyone not feeling well. Tis the season unfortunately. The strip in the middle is made of tiny micro beads. I love the copper cardstock!

Thursday, October 27, 2011

Give thanks

Designed for: Dolce Stamps and Cards
Artist: Tara Williams
Title: Give Thanks
Stamp(s): Stampendous (couldn't find on site Sandy), SU Fancy flexible phrases
Ink: Memento Tuxedo Black, various Copics, Copics colorless blender
Paper: Hopsock Land, Copper cardstock
Accessorries: Ribbon, Brads, 3D adhesive
Tools: Bigshot, Spellbinders Nestabilities, circle punch, scallop punch, 1/16 hole punch

I always love this time of the year. The leaves are turning amazing colors in the Seattle area and the air gets a bite to it, which means, I have more time inside to craft some more cards. It also means I get to start thinking about the holidays and all the fun cards and projects that come with stamping. My favorite pieces on this card are the diecut, which I think makes it so fancy looking. Then the copper cardstock gives it that pop that is so lovely. Please take a few minutes to look through my amazing design team members blogs and SCS sites. Their work is absolutely amazing! http://www.dolcestampsandcards.blogspot.com/ for the other design team's gorgeous work

Sunday, October 23, 2011

Happy Haunting

This card was super fun to make because I LOVE Halloween! I just attended my first costume party last night. I dressed as 'Malice in Wonderland'. It's the darker version of Alice. I pulled off a jet black wig. It was lots of fun! 

This card needed faux stitching on it.I embossed the witch in black detail.I want to make a second card as I originally had forgotten about the stitching, so I had to throw it on in a hurry to get to Dolce, and it is a little 'off'.

Thursday, September 29, 2011

Out for an autumn drive

There's a new challenge over at Dolce Stamps and Cards. Every other Thursday we will post a new challenge and you  have the chance to win a gift card to the store. Please visit: http://dolcestampsandcards.blogspot.com/ for all the details. Today's challenge is to use fall colors. All of the design team members used fall colors and over on the Dolce Blog you can see the result of my teammates gorgeous cards!
This is mine. After spending a couple of hours watercoloring, I decided I need to take a class. Lots of little detail on coloring this card. I used watercolor pencils. My tip on this card is to be sure you punch your corners and then emboss :-) I'm glad you can learn from my mistakes.
Information on the card:
Artist: Tara Williams
Date: September 29, 2011
Title: Out for an autumn drive
Stamp:Impression Obsession 'Covered Bridge Scene'

 
Paper: Solid cardstock--Tuscan Sun, Hot Fudge, & Fossil from from Earth Variety pack
Embellishments: HARVEST MED CIRCLE BRADS Hero Arts 'Earth Ribbon',
Tools: Paper Trimmer, Corner Punch, Sizzix Big Shot,

Polka Dog Embossing Folder
3-D Adhesive foam
--Please visit: dolcestampsandcards.com for all of the products listed above.
As always,
Happy Stamping
Tara

Sunday, September 25, 2011

New technique: Letterpress emboss

I am in a Stampin Up! card club that meets bimonthly. For our swaps, we were to try a new technique we'd never done. I chose a letterpress emboss technique. I have never done this before and I found it well, challenging! I was expecting it to be a much deeper embossed image. I think that may have to do w/ the plate I used w/ my Cuttlebug. I am going to get a new set of plates, hopefully today. I'm irritated w/ myself I wasn't flipping them and one got really warped. Lesson learned there! :-)

For the letterpress, you ink up the plate (easiest with a brayer) then lay your paper on top and put your clear plate on top and run through your embossing machine (Big Shot, Sizzix, or Cuttlebug). I used Fancy Fan from SU. 

If any of you need any SU supplies and don't have a demonstrator already, I'd love if you visited my girlfriend's site listed. She's one of my besties!

Happy Sunday & as always,
Happy Stamping ladies!!

Monday, September 19, 2011

Butterfly Garden


Artist: Tara Williams
Card Title: Butterfly Garden
Date: 9-19-11
Stamp(s): Impression Obsession 'Garden Planter'
Paper(s): Earth Variety 'Tangy Orange', Cosmo Cricket 'Salt Air'
Accessories: Kaiser Craft Organza Ribbon ('Green' Set)
Tools: Photo Corner punch, Paper trimmer, Nail file
Ink, Color: Momento 'Tuxedo Black', various Copic pens, Chalklets Chalk 'Nursery Rhymes'
Style/Technique: Distressing

It's not often I find myself choosing to do distressing. I had to put my thinking cap on. I chose to do something different from what I thought was traditional distressing. I used bright colors in the planter and made everything else look aged. I ripped the cardstock and roughed up all the edges with a nail file (one used for acrylic nails that really has grit. Sandpaper would work also). I also scraped the designer paper with the file to scratch it. Finally, I heated the organza ribbon (only takes a couple of seconds) to get the ruffled look.
Thanks for looking. Be sure to check out all the designer's cards for Dolce. I'm humbled by their amazing work! You can see their designs at: http://dolcestampsandcards.blogspot.com/

Tuesday, September 13, 2011

Celebrate the Journey!

Title: Celebrate the Journey
Designer: Tara Williams
Date Posted on Dolce site: Aug 15, 2011
Keywords: Dolce, Local King Rubber Stamp
Category: Friendship, Bon Voyage, Best Wishes, Congrats
Stamps: Local King Rubber Stamp


Ink: Memento Tuxedo Black
Embellishments:
Mark Richards Nail Heads, Shimmer Mist, Black fine detail embossing powder
Adhesive(s):
3D Foam Squares, Tombow tape runner Tools:Bone Folder, heat gun for embossing, detail scissors, Big Shot for embossing small balloons
Paper: Festive Variety Pack: Blu Raspberry, cloud background scrapbooking paper, basic white, pink gingham scrapbook paper
To create a card like above, or something completely different, please visit dolcestampsandcards.com for products listed above, and many more!


Description: This was a fun and simple card to make. Each balloon is cut out with detail scissors.The pink gingham balloon is popped up with 3D foam squares to give it dimension. I've never had any hot air balloon stamps, so I was happy to make a card that featured them. About 10 miles from where I live you can see them setting off into the sky every now and then. It is quite a sight!

Local King 'Hot Air'

Title: Up, up & away!
Artist: Tara Williams
Date: 9-13-11
Stamps: Local King 'Hot Air'
Paper: Festive Variety, Orange Fizz, Marigold Felt & Cosmo Cricket 'Salt Air' printed paper
Accessories: Black mini brads, Diamond Glaze, green copper wire for balloon 'strings', sparkle jelly pen
Tools: Corner punch, scallop punch, oval punch, 1/16 hole punch for brads and faux sun
Please visit dolcecardsandstamps for the above products to create your own fun designs!

Description: I tried challenging myself for this card. In order to create the rolled corners, I took a ballpoint pen and curled the paper around it and marked the spot for the brad. I then punched the holes (only through the printed paper and not cardstock) and placed the brads. I've only used Diamond Glaze a couple of times and wanted to brighten the faux sun I created with that. I then took a hole punch around the scallop punch for a different sunny look. The most difficult part of the card that took the majority of the time was lining up the tiny, very bendable wires for the strings to the hot air balloon. They bend easily. I would probably use a different product next time :-)

Friday, August 12, 2011

Get well: JustRite & Spellbinders

I simply ADORE JustRite stamps. Having teamed up with Spellbinders is even cooler. I tried to do a little 'more' on this card for extra oomph. I haven't used vellum in a loooong time, so it was fun incorporating that. Since it's always a challenge to use adhesive with vellum and having it not show, that's how the glitter got incorporated. The glitters that Dolce Stamps & Cards offer make it much less messy since they are superfine.


Wednesday, July 20, 2011

Friends are flowers in the garden of life

Designer: Tara Williams
Date Posted: July 19, 2011
Keywords: Dolce, JustRite
Category: All Occasion, friendship
Stamps: Wood Stamper Round 3 1/4, My Garden Set
Ink: Memento Tuxedo Black, Memento 'Dandelion' used for dyeing flowers
Copic Pens
Embellishments: Petaloo Color Me Crazy flower, Mark Richards Crystal Stickers Pearls, 5 MM, 3D Foam Squares
Tools:Judikins Detail Scissors, Bone Folder, Corner Punch, Spellbinders Circle, Sizzix 3 1/2 die cut
Paper: Blu Raspberry (Festive Variety Pack), Basic Grey Paper Pad for designer paper

I just LOVE JustRite. The products are so versatile, which give you endless options. I love that I can use an outside ring (words in this case) with whichever center flower. I have never had the pleasure to use them, but I will definitely be adding these in regular rotation. It's so cool how the Spellbinders Die Cuts specially coordinate with JustRite Stamps.Thank you Dolce Stamps and Cards for this awesome experience!

Monday, July 11, 2011

Bon Voyage Butterfly

Designer: Tara Williams
Date Posted: July 6, 2011
Keywords: DolceJun11, My Heart Stamps for You
Category: All Occasion
Stamps: Painted Lady Butterfly by My Heart Stamps for You
Ink:Adriondack
LIGHTS PADS PEACH BELLINI, VERSAMARK-WATER MARK STAMP PAD
Embellishments: Petaloo Color Me Crazy flower, Glitter Ritz White, Kaiser Rhinestone Silver, 3D Foam Squares
Tools:Judikins Detail Scissors, Bone Folder, Corner Punch
Paper: Banana Split (Pastel Variety Pack), Cosmo Cricket Salt Air Mini Deck DP

Since I love the butterfly so
much I really enjoyed these butterfly stamps from My Heart Stamps for You! I added a little sparkle to this one with a bit of glitter on her wings and then paired her with a Petaloo Color Me Crazy flower that I dyed to match with the same ink. Popping up the corners of my "frame" makes the whole thing look a bit like a shadow box in a butterfly collection. Hope you like the card. I'm eager to get back and make some more! 

If you need any more information or are interested in any of the above products used, please visit: www.dolcestampsandcards.com

Wednesday, June 15, 2011

Blog candy!!


WOW! Look what you can win. Please visit Dolce Stamps & Cards for details on the blog hop. http://dolcestampsandcards.blogspot.com/

Beach Babes


Oooooh, finally! I really struggled w/ the detail on this image. It's a cute image for sure, but it was tough for me. Something for me to work on definitely.
The following is the list of Dolce products used:

Art Impressions "Girlfriends" cling stamp
Art Impressions "Beach Babes" cling stamp
Momento Tuxedo Black Ink
3-D Dots adhesive squares
5 MM self-adhesive pearls round by Crystal Stickers
Pearl Ex opal brushed on pink (shimmer would work even better as it sets it automatically)
Sizzix Dots embossing folder (set of two which also includes a flowers folder)

Tuesday, June 14, 2011


Wow, look at me! Stay tuned for some exciting news for BLOG CANDY!

Tuesday, May 24, 2011

Selected as a Dolce Stamps & Cards Design Team Member

I'm SO thrilled to have been selected as one of the Design Team members! I'm among some very talented ladies. This will be sooo much fun and I'm looking forward to getting my kit in the next day or two and getting started. Woohoo!!

Tuesday, May 3, 2011

Many Spring Cards

With Spring, brings lots of rain in Seattle, but tons of bright colors for the flowers as well as my cards.

A first for me is getting way ahead of the exchange cards I do with a group of anywhere from 15-20 ladies. We meet on a quarterly basis and have different themes every time. It's so awesome to see what everyone comes up with. The quality of the cards gets better every time. (If you ever want to participate, just let me know and I'll add you to the next invite. Next one: July 20th. Themes: Baby & stamper's choice).

For my choice card, I'm doing a friendship card that is a tri-fold and it's something I've never done on my own. The front will open in the middle of the card and have 'doors'. I made the side 1/4 inch thick so I can put a chipboard flower inside. It could be a treat holder too. The only problem is now I have to get different envelopes, which we include in the exchanges.

My other card is a cute baby card and I'm using some purple embossing powder.

I will post pics of each when I finish them. I've never been this far ahead, so I'm really proud of myself.

For the Dolce Stamps & cards I need to make some items that aren't cards for their blog. I think gift bags, boxes and some other items will be good additions. I'll get more creative than that when I sit down to work on them.

Tuesday, April 19, 2011

New Happenings

Through a client I was introduced to Dolce Stamps and Cards in Northgate. I'm assisting them in driving business to their website and store. I guess you could call me a consultant. I will also be part of their design team, which they are looking to start in the next week or two. Exciting stuff for me. Look for more cards and projects in the upcoming days and weeks.