Followers

Thursday, September 29, 2011

Out for an autumn drive

There's a new challenge over at Dolce Stamps and Cards. Every other Thursday we will post a new challenge and you  have the chance to win a gift card to the store. Please visit: http://dolcestampsandcards.blogspot.com/ for all the details. Today's challenge is to use fall colors. All of the design team members used fall colors and over on the Dolce Blog you can see the result of my teammates gorgeous cards!
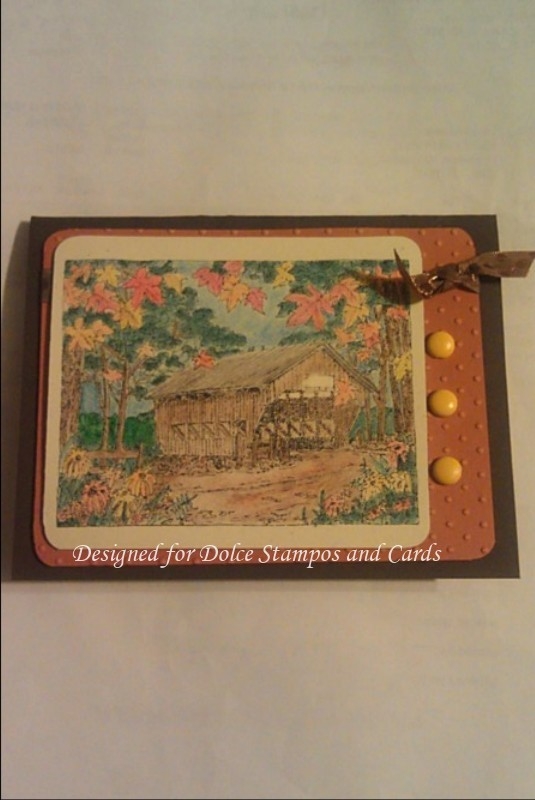
This is mine. After spending a couple of hours watercoloring, I decided I need to take a class. Lots of little detail on coloring this card. I used watercolor pencils. My tip on this card is to be sure you punch your corners and then emboss :-) I'm glad you can learn from my mistakes.
Information on the card:
Artist: Tara Williams
Date: September 29, 2011
Title: Out for an autumn drive
Stamp:Impression Obsession 'Covered Bridge Scene'

 
Paper: Solid cardstock--Tuscan Sun, Hot Fudge, & Fossil from from Earth Variety pack
Embellishments: HARVEST MED CIRCLE BRADS Hero Arts 'Earth Ribbon',
Tools: Paper Trimmer, Corner Punch, Sizzix Big Shot,

Polka Dog Embossing Folder
3-D Adhesive foam
--Please visit: dolcestampsandcards.com for all of the products listed above.
As always,
Happy Stamping
Tara

Sunday, September 25, 2011

New technique: Letterpress emboss

I am in a Stampin Up! card club that meets bimonthly. For our swaps, we were to try a new technique we'd never done. I chose a letterpress emboss technique. I have never done this before and I found it well, challenging! I was expecting it to be a much deeper embossed image. I think that may have to do w/ the plate I used w/ my Cuttlebug. I am going to get a new set of plates, hopefully today. I'm irritated w/ myself I wasn't flipping them and one got really warped. Lesson learned there! :-)

For the letterpress, you ink up the plate (easiest with a brayer) then lay your paper on top and put your clear plate on top and run through your embossing machine (Big Shot, Sizzix, or Cuttlebug). I used Fancy Fan from SU. 

If any of you need any SU supplies and don't have a demonstrator already, I'd love if you visited my girlfriend's site listed. She's one of my besties!

Happy Sunday & as always,
Happy Stamping ladies!!

Monday, September 19, 2011

Butterfly Garden


Artist: Tara Williams
Card Title: Butterfly Garden
Date: 9-19-11
Stamp(s): Impression Obsession 'Garden Planter'
Paper(s): Earth Variety 'Tangy Orange', Cosmo Cricket 'Salt Air'
Accessories: Kaiser Craft Organza Ribbon ('Green' Set)
Tools: Photo Corner punch, Paper trimmer, Nail file
Ink, Color: Momento 'Tuxedo Black', various Copic pens, Chalklets Chalk 'Nursery Rhymes'
Style/Technique: Distressing

It's not often I find myself choosing to do distressing. I had to put my thinking cap on. I chose to do something different from what I thought was traditional distressing. I used bright colors in the planter and made everything else look aged. I ripped the cardstock and roughed up all the edges with a nail file (one used for acrylic nails that really has grit. Sandpaper would work also). I also scraped the designer paper with the file to scratch it. Finally, I heated the organza ribbon (only takes a couple of seconds) to get the ruffled look.
Thanks for looking. Be sure to check out all the designer's cards for Dolce. I'm humbled by their amazing work! You can see their designs at: http://dolcestampsandcards.blogspot.com/

Tuesday, September 13, 2011

Celebrate the Journey!

Title: Celebrate the Journey
Designer: Tara Williams
Date Posted on Dolce site: Aug 15, 2011
Keywords: Dolce, Local King Rubber Stamp
Category: Friendship, Bon Voyage, Best Wishes, Congrats
Stamps: Local King Rubber Stamp


Ink: Memento Tuxedo Black
Embellishments:
Mark Richards Nail Heads, Shimmer Mist, Black fine detail embossing powder
Adhesive(s):
3D Foam Squares, Tombow tape runner Tools:Bone Folder, heat gun for embossing, detail scissors, Big Shot for embossing small balloons
Paper: Festive Variety Pack: Blu Raspberry, cloud background scrapbooking paper, basic white, pink gingham scrapbook paper
To create a card like above, or something completely different, please visit dolcestampsandcards.com for products listed above, and many more!


Description: This was a fun and simple card to make. Each balloon is cut out with detail scissors.The pink gingham balloon is popped up with 3D foam squares to give it dimension. I've never had any hot air balloon stamps, so I was happy to make a card that featured them. About 10 miles from where I live you can see them setting off into the sky every now and then. It is quite a sight!

Local King 'Hot Air'

Title: Up, up & away!
Artist: Tara Williams
Date: 9-13-11
Stamps: Local King 'Hot Air'
Paper: Festive Variety, Orange Fizz, Marigold Felt & Cosmo Cricket 'Salt Air' printed paper
Accessories: Black mini brads, Diamond Glaze, green copper wire for balloon 'strings', sparkle jelly pen
Tools: Corner punch, scallop punch, oval punch, 1/16 hole punch for brads and faux sun
Please visit dolcecardsandstamps for the above products to create your own fun designs!

Description: I tried challenging myself for this card. In order to create the rolled corners, I took a ballpoint pen and curled the paper around it and marked the spot for the brad. I then punched the holes (only through the printed paper and not cardstock) and placed the brads. I've only used Diamond Glaze a couple of times and wanted to brighten the faux sun I created with that. I then took a hole punch around the scallop punch for a different sunny look. The most difficult part of the card that took the majority of the time was lining up the tiny, very bendable wires for the strings to the hot air balloon. They bend easily. I would probably use a different product next time :-)